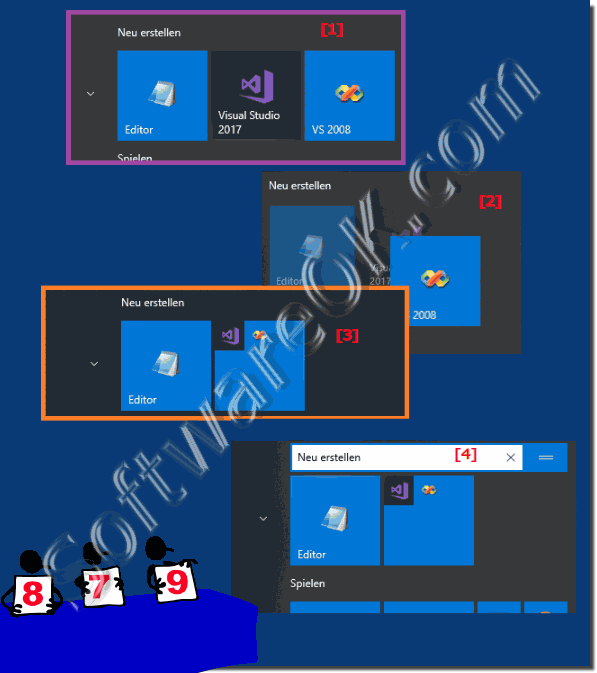
The practical grouping of the tiles in the Windows 10 start menu is very popular if you have a lot of start menu shortcuts!
Not possible in Windows 11!
If you have customized the Start menu under Windows 10 , it is also quite easy to group the tiles in the Start menu into a single folder. Very practical, because it saves space for many tiles / shortcuts and for smaller tablets or MS Surface you can sort the programs and apps better!
See also: Place the trash in the start menu!
Content:
1.) ... Folders / grouping the tiles / shortcuts in the Windows 10 start menu!
2.) ... Advantages and disadvantages of grouping tiles in the Windows 10 start menu!
1.) Folders / grouping the tiles / shortcuts in the Windows 10 start menu!
1. To create a folder / group2 Move a tile onto the other tile (drag and drop)
3. When you drop a tile becomes larger and you can now drop the tile / link
4. Now a folder or Grouping made
5. Optional: the group can also be labeled
(... see Image-1 Point 1 to 4)
PS:
It works very easily and can be implemented quickly, you should only possibly enlarge the tile so that you can group better . If you want you can remove one or more APPs from the app grouping at any time until the group is empty and then the grouping disappears from the start menu if there is only one app or program link in the grouping, so very simply the whole thing .
It works very easily and can be implemented quickly, you should only possibly enlarge the tile so that you can group better . If you want you can remove one or more APPs from the app grouping at any time until the group is empty and then the grouping disappears from the start menu if there is only one app or program link in the grouping, so very simply the whole thing .
| (Image-1) EASY grouping of tiles in the Windows 10 start menu! |
 |
2.) Advantages and disadvantages of grouping tiles in the Windows 10 start menu!
Grouping tiles in the Windows 10 Start menu has both advantages and disadvantages, depending on your individual preferences and work habits. Here are some advantages and disadvantages of grouping tiles:
Advantages of grouping tiles:
Organization: Grouping tiles allows you to organize your applications and shortcuts by category or function, increasing clarity.
Space saving: Groups can save space on the Start menu, especially if you have a lot of applications. This allows you to see more items on the screen without having to scroll.
Quick Access: Groups provide quicker access to certain types of applications because you can find them at a glance without having to scroll through a long list of applications.
Customizability: You can name and organize groups according to your own needs to adapt the structure of the Start menu to the way you work.
Disadvantages of grouping tiles:
Complexity: Grouping tiles can make the Start menu more complex, especially if you create many different groups and subcategories. This can make navigation difficult.
Time required: Creating and managing tile groups requires time and effort. It can be frustrating if you frequently install or uninstall new applications because it affects the group structure.
Hidden tiles: In larger groups, it may be difficult to see all available tiles at a glance as some tiles may be hidden. This requires additional scrolling or clicking to access desired applications.
Takes some getting used to: Some users may prefer the simple, flat tile list because they can navigate through it more quickly. Grouping tiles takes some getting used to and may require you to adjust the way you work.
Overall, the pros and cons of grouping tiles in the Start menu depend on your personal preferences and work style. Some users find the organization and quick access to applications through grouping very useful, while others prefer the simplicity of a flat list. You can customize the grouping strategy to suit your needs and preferences.
3.) Further tips Folders / grouping tiles / shortcuts in the Windows 10 Start menu!
In Windows 10, you can group and organize the tiles or shortcuts in the Start menu to create a custom arrangement. Here's how you can do that:
Open the Start menu: Click the Windows icon on the taskbar or press the Windows key on your keyboard to open the Start menu.
Add tiles: To add tiles or shortcuts, you can click All Apps and then right-click the program or folder you want. To add a tile, select “Pin to Start” from the context menu.
Move tiles: You can drag and drop tiles to change their position in the Start menu. Drag a tile to the desired location and release it there.
Create tile groups: You can organize tiles into groups by dragging them horizontally and overlapping them. This will automatically create a group that you can name by clicking and editing the group's name.
Customize tiles: You can also resize tiles or separate tiles from the group by right-clicking a tile and selecting the desired option.
Remove tiles: To remove tiles or shortcuts from the Start menu, right-click the tile and select Remove from Start from the context menu.
Organize tiles by categories: You can also create categories or folders to organize tiles. Simply create a new folder, drag tiles into that folder, and name it as needed.
By customizing and organizing tiles and shortcuts in the Start menu, you can personalize the Start screen and easily access the apps and folders you use most. This makes navigation and productivity in Windows 10 easier.
