To sort or select and print images in Microsoft File Explorer, you can follow the following solutions!Contents: 1.) ... sort and print images in MS File Explorer!
|
| (Image-3) Print images in MS File Explorer! |
 |
Additional tips
- Print preview:
Before printing, check the print preview to make sure images are correctly aligned and scaled.
- Consider file types:
Make sure images are in a compatible format (e.g. JPEG, PNG) as some printers and programs may not support certain formats.
- Check printer status:
Make sure your printer is connected and set up correctly and that you have enough paper and ink/toner.
- Use additional software:
For more advanced print settings or printing collages, you could use software such as Adobe Photoshop or specialized printing software.
By following these steps, you can easily sort and print images in Microsoft File Explorer and ensure that your prints turn out the way you want.
2.) Select images in MS File Explorer and print!
To select and print images in Microsoft File Explorer, you can follow these steps:Step 1: Select images in File Explorer
1. Open File Explorer:
- Open File Explorer by clicking the folder icon in the taskbar or by pressing `Windows + E`
2. Navigate to folder:
- Go to the folder containing the images you want to print
3. Image selection:
- Select single image:
Just click on the image
- Select multiple images:
- Using the mouse:
Hold down the left mouse button and drag a rectangle around the images you want.
- Using the keyboard:
Hold down the `Ctrl` key and click on each image you want to select. Alternatively, you can hold down the `Shift` key and click on the first and last image in a row to select all images in between.
- Select all images:
Press `Ctrl + A` to select all images in the current folder.
Tip. ►► How do I select non-adjacent files in Explorer list view?
Step 2: Print images
Option 1: Print directly via File Explorer
1. Open the print menu:
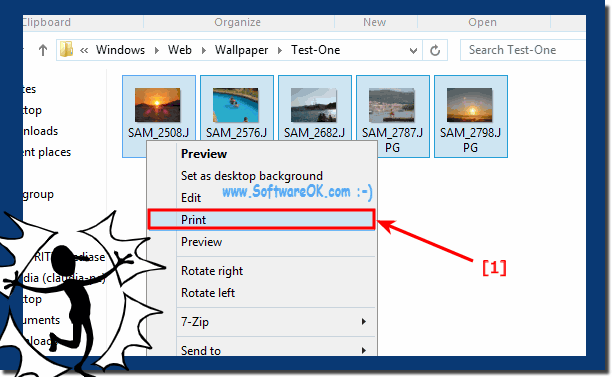
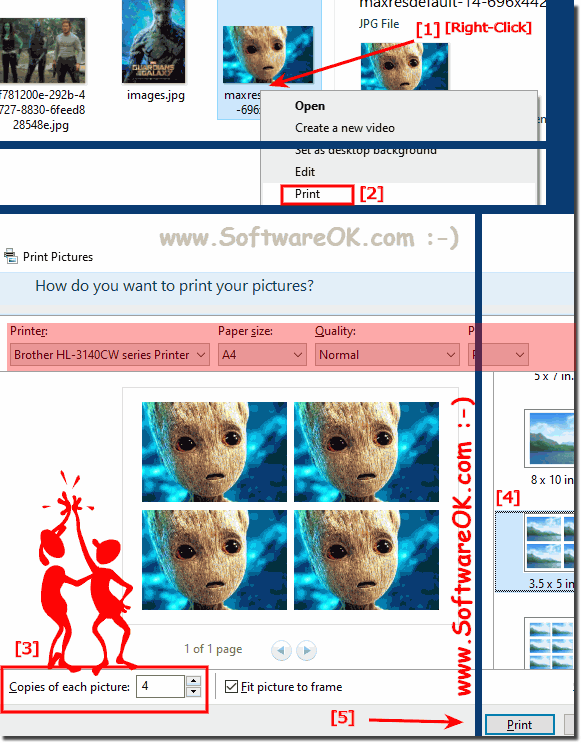
- Right-click on one of the selected images.
- Select "Print" from the context menu.
2. Set print settings:
- In the "Print Images" window you can set various options:
- Select printer:
Select the desired printer from the list.
- Paper size:
Select the paper size (e.g. A4, 10x15 cm).
- Print quality:
Select the desired print quality (e.g. Portrait, Standard).
- Layout:
Choose a layout (e.g. one image per page, multiple images per page).
- Number of copies:
Specify how many copies you want to print.
- Check the print preview on the right to make sure the images are placed as desired.
3. Print:
- Click "Print" to start printing.
Option 2: Print from an image viewer
1. Open image viewer:
- Double-click an image to open it with your default image viewer (eg Microsoft Photos).
2. Open the print menu:
- In Microsoft Photos or similar programs, click the printer icon or go to File > Print or use the keyboard shortcut `Ctrl + P`.
3. Adjust print settings:
- Choose the printer, paper size and quality.
- Check the layout and print preview.
- Click Print to start printing.
Option 3: Print using special printing software
1. Open image editing or printing software:
- Open an image editing software (eg Paint, Adobe Photoshop) or dedicated printing software if you need more options and flexibility.
2. Import and print images:
- Import the desired images into the software.
- Adjust the print settings and layouts as needed.
- Start the printing process using the print function of the software.
Additional tips
- Image sizes and resolutions:
Make sure that the images are of sufficient resolution to ensure good print quality.
- Printer driver:
Make sure that your printer driver is up to date to avoid problems.
- Paper type:
Use the appropriate paper for printing (eg photo paper for photos) to achieve the best quality.
- Print preview:
Use the print preview to make sure that the images are correctly aligned and scaled.
These steps will help you effectively select and print images in Microsoft File Explorer, ensuring that your prints are exactly as you envisioned.
| (Image-2) How can I select and print images in MS File Explorer? |
 |
3.) Select, sort, print, etc. important questions and answers!
1. How do I select multiple images in File Explorer?**
2. How do I sort images in File Explorer?**
3. How can I select only certain images to print?**
4. How do I print multiple images on one page?**
5. Can I edit the images before printing?**
6. How do I change the print size of the images?**
7. How do I print images in a specific order?**
8. How do I select a different image viewer to print with?**
9. What formats are supported by most printers?**
10. How can I make sure my printer is set up correctly?
11. Sorting and printing images: step-by-step instructions**
To give you a detailed guide on how to select, sort and print images in Microsoft File Explorer, I have compiled 10 important questions and answers. These will help you to better understand the process and successfully implement it.
1.) How do I select multiple images in File Explorer?**
Answer
:
- With the mouse
: Hold down the left mouse button and drag a rectangle around the desired images.
- With the keyboard
: Hold down the "Ctrl" key and click on each image you want to select. You can use "Shift" to select a range of images by clicking on the first and last image.
- Select All
: Press "Ctrl + A" to select all images in the folder.
2.) How do I sort images in File Explorer?**
Answer
:
- Open the folder that contains the images.
- Click on "View" and select "Details".
- Click the column heading "Name", "Date", "Type" or "Size" to sort the images by that criteria. Clicking again will reverse the order.
3.) How can I select only certain images to print?**
Answer
:
- Select the images you want by clicking while holding down the "Ctrl" key.
- Right-click on one of the selected files and select "Print" from the context menu.
4.) How do I print multiple images on one page?**
Answer
:
- Select the images and click "Print".
- In the Print window, under "Layout", you can select an option such as "Contact Sheets" or "Multiple Images Per Page" to print multiple images on one page.
5.) Can I edit the images before printing?**
Answer
:
- Yes, open the images in an image editing program such as Microsoft Photos or Paint.
- There you can crop, rotate or edit the images before printing them.
6.) How do I change the print size of the images?**
Answer
:
- In the print dialog you can change the paper size and layout options.
- You can scale the image by adjusting the print quality and image size in the printer settings.
7.) How do I print images in a specific order?**
Answer
:
- Rename the images accordingly so that they are sorted in the desired order (e.g. 01, 02, 03).
- Select the images and print them in the sorted order.
8.) How do I select a different image viewer to print with?**
Answer
:
- Right-click on the image and select "Open with".
- Select the desired image viewer from the list and use its print function.
9.) What formats are supported by most printers?**
Answer
:
- The most common image formats are JPEG, PNG and BMP.
- Check that your printer supports these formats to avoid compatibility issues.
10.) How can I make sure my printer is set up correctly?
Answer
:
- Make sure the printer driver is installed and up to date.
- Check that the printer is connected correctly and is working. If necessary, perform a test print.
11.) Sorting and printing images: step-by-step instructions**
Step 1: Selecting and sorting the images
1. Open File Explorer and navigate to the folder with the images.
2. Select the images you want by holding down the "Ctrl" key and clicking on them.
3. To sort the images, click on the desired column heading such as "Date" or "Name".
Step 2: Print options in File Explorer
1. Right-click on the selected images and select "Print".
2. In the print dialog, select the printer, paper size and layout.
3. Check the print preview and adjust the settings if necessary.
4. Click "Print" to print the images.
Additional tips
- Use high-quality photo paper for best print results.
- Use the print preview to check the arrangement of the images.
- Experiment with different layouts to get the best result.
This Q&A and step-by-step guide will give you a comprehensive guide to selecting, sorting and printing your images in File Explorer. This will help you ensure that your images print correctly and meet your needs.
FAQ 13: Updated on: 11 June 2024 16:45
